Connect the store in Odoo
Before you start
- The app is installed (Installation). It installs the Commerce Bridge engine and the Online Stores app.
- You have the consumer key and secret (Create the API key).
- You are an Odoo administrator, or have the Online Stores / Administrator right. Only administrators see the Connection tab.
Create the store
- Open Online Stores and click New.
- Enter a Name, for example Northwind Store. It appears on orders, jobs and the dashboard.
- Choose the platform WooCommerce. The order prefix becomes
WC-(change it on the Orders tab if you like). - On the Connection tab, under WooCommerce, fill in:
- Store Address: the address of the shop, for example
https://shop.example.com. Withouthttps://Odoo assumes https. If WordPress lives in a sub-folder, include it (https://example.com/shop). - Consumer Key and Consumer Secret.
- Authentication: leave Automatic (recommended), see below.
- Check SSL Certificate: leave it on.
- Store Address: the address of the shop, for example
- Click Test Connection.
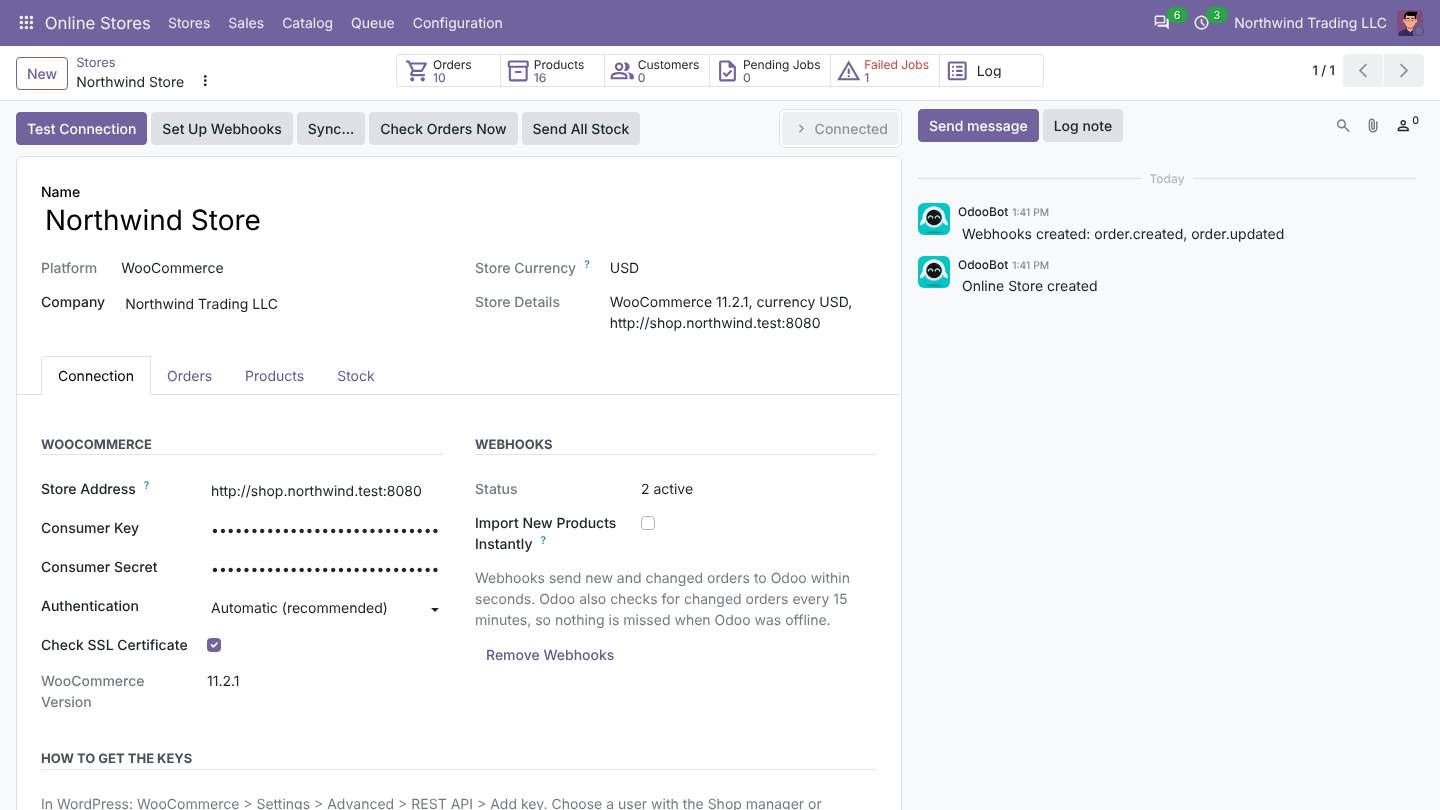
What Test Connection does
Odoo reads the WooCommerce system status of the store and then:
- sets the store to Connected,
- fills Store Currency and Store Details (WooCommerce version, currency, site address) at the top of the form, and WooCommerce Version on the Connection tab,
- posts a note in the chatter when the store reports a different home address than the one you entered (for example
www.missing). Use the address the store reports.
If the test fails, the store goes to Connection Error and the chatter shows the reason. See FAQ for the usual causes.
Authentication modes
| Mode | How Odoo sends the key | Use it when |
|---|---|---|
| Automatic (recommended) | HTTP Basic on https:// addresses, OAuth 1.0a signature on http:// addresses | Almost always. |
| HTTP Basic (https) | Authorization: Basic header | You want to force Basic on https. |
| Keys in the address (https, when the host removes the Authorization header) | consumer_key and consumer_secret as URL parameters | Some hosts (often Apache with CGI/FastCGI) drop the Authorization header, so WooCommerce answers 401 even with correct keys. Only over https. |
| OAuth 1.0a signature (http) | Each request signed with HMAC-SHA256, nonce and timestamp | Stores on plain http (for example a local test store). |
tip
Getting Sorry, you cannot list resources (HTTP 401) with keys you just created? Switch Authentication to Keys in the address and test again.
Check SSL Certificate
On, Odoo refuses stores with an invalid or self-signed certificate (SSL certificate problem). Turn it off only for test stores with a self-signed certificate. Never turn it off for a live store: the keys would travel over a connection that is not verified.
Good to know
- Odoo retries a request up to 3 times when the store is busy (HTTP 429, 502, 503, 504) or not reachable, waiting a few seconds between tries.
- Each request times out after 40 seconds (image uploads 80 seconds).
- Changing the keys later takes effect on the next job. Click Test Connection again to check.
- In a duplicated (test) database the store reads from WooCommerce but never writes to it. See Test copies.
Next steps
- Review all store settings.
- Import your catalog with Sync... (Import products).
- Set up webhooks.
- After the first orders, set up the payment methods.
Was this page helpful?